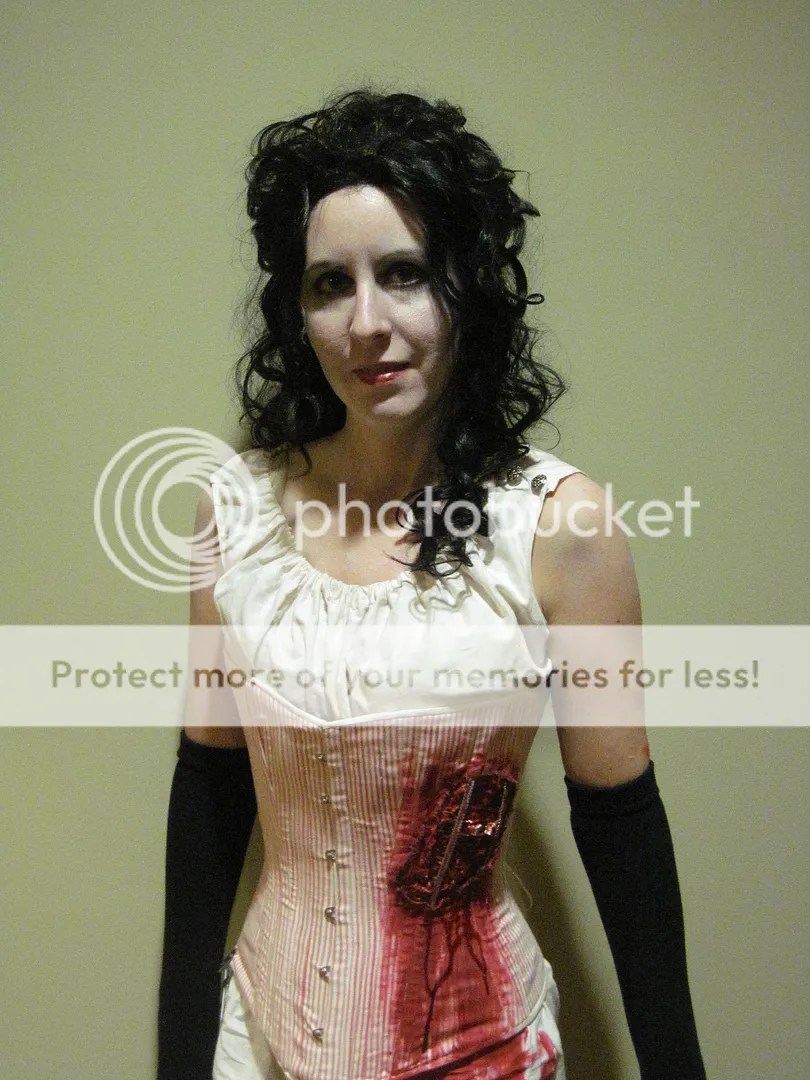
I really, really liked this costume! It’s weird, because I’ve never been a gory costume kinda girl. But I had so much fun figuring out to make this work, and it was so different from anything I’ve done before! I don’t know…I may have to make another gory costume sometime….I have this great idea for fake intestines….. *shudder*
Anyway, it had a great reception at Steamcon IV.
The finishing touch ended up being this 3D gel blood I bought. It’s amazing stuff! You warm it in a microwave, and then apply it. After a few minutes it sets into the most realistic blood – sort of rubbery to the touch. You can let it drip, etc, to make it look real. You can put it on your skin as well – and if you “roll” it off your skin and put it back in the bottle, it’s actually reusable!
I used “Living Nightmare” brand. I’m going to have to go back and get another bottle for the Steampunk Ghost. This stuff is wonderful!
These pictures aren’t very good; I had something else on the dummy so I couldn’t show you how it looks on a body. The color isn’t right, either – my camera is complete crap at capturing true color. The broken bone shows up better in real life, too.
But overall, I’m super happy with how this turned out. I want to do MORE gross costuming now! *grin*
Inspired by the color and rich embroidery of Bollywood films, I created this gown for her.
The underskirt is purple silk, the overskirt is embroidered tulle over a green satin lining. In front, the skirt is decorated with two small jeweled hummingbirds.
It has a small detachable train in back.
One thing I did not finish is the back lacing. I seem to be out of grommets at the moment….
It’s a pity that my camera just could not capture the true shiny glorious-ness of this gown! The embroidery has a ton of beads and spangles and really catches the light.
I may add a sash as in the original sketch…if it goes well with the hummingbirds.
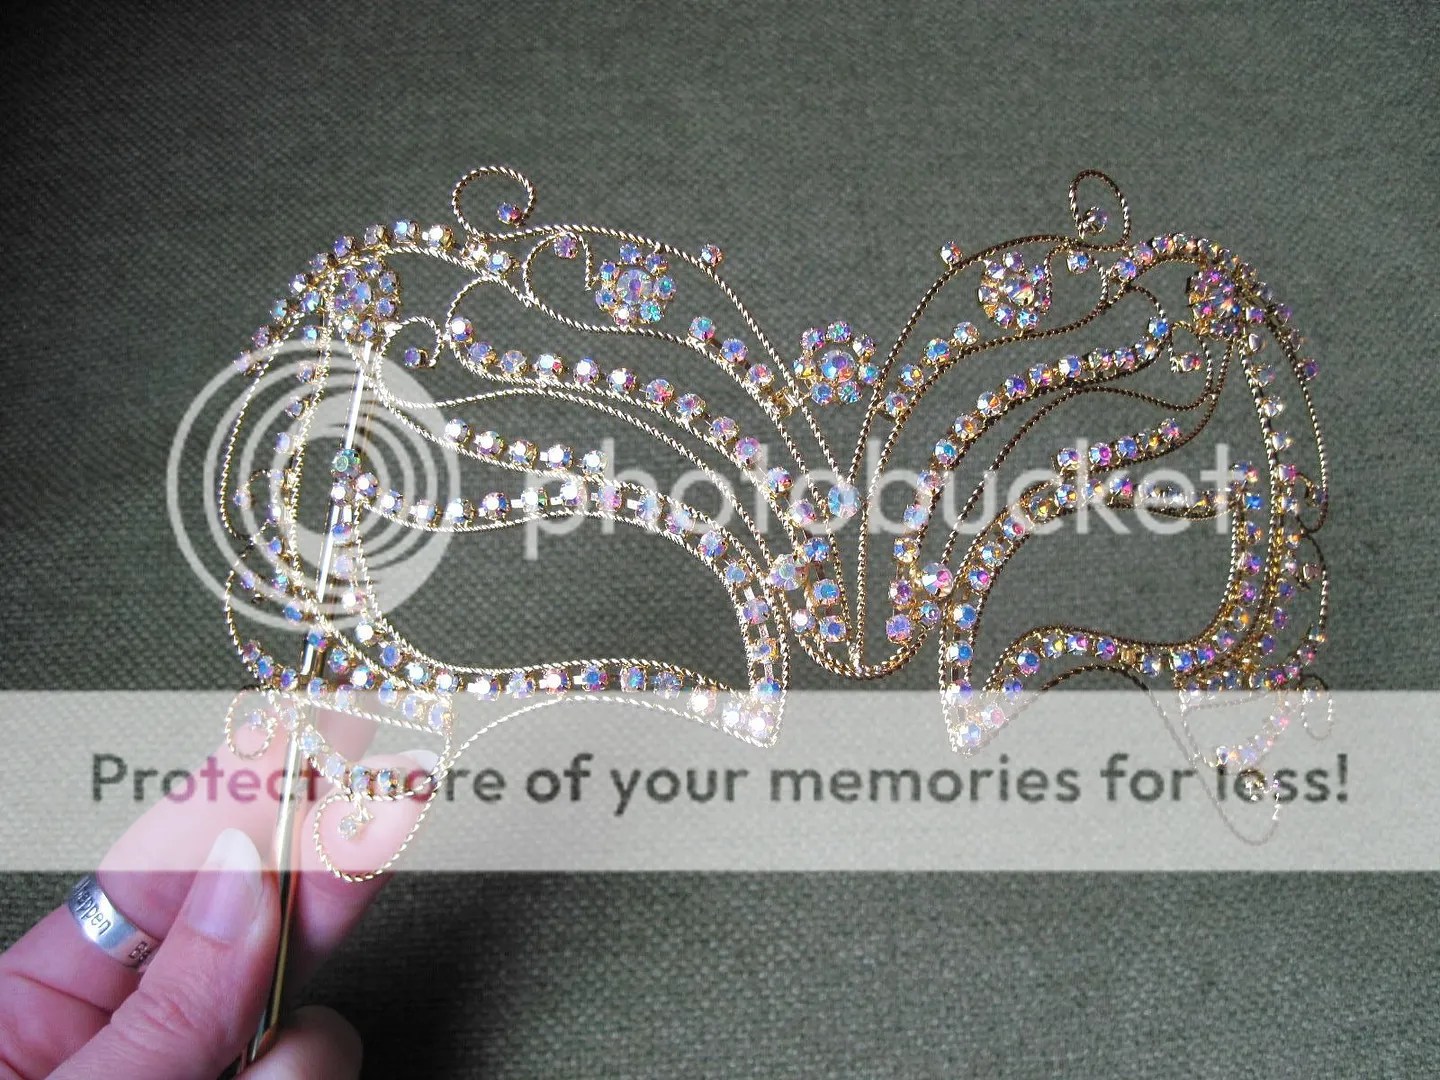
While in LA earlier this year, I found the perfect mask.
The wedding dress in done. Well, except for putting grommets in the swiss waist. I discovered I was out of silver ones, so I had to order some. They’ll be here next week, so I can put those in and ship this dress to Montana for its big photoshoot.
I’m not going to lie; I’m VERY ready to be finished sewing 25 yards of Ivory silk! If I were making a dress for myself, it would never be in this color. Good thing I have very colorful projects lined up next!
So, on to the pictures!
I made it with a detachable train. The skirt is altered from Truly Victorian’s #125. It’s a petticoat pattern, but I left out the net inside, only used the outer shell. And I’ll let you in on a little secret…I sewed it together upside down, using the hem as the waistline, and the actual waist as the hem. Why? Because I accidentally put it on my dummy that way (don’t ask me how!) and it worked. It worked fantastically!
The smaller circumference around the lower legs drew the skirt in to almost a Victorian version of a mermaid dress, and the really large circumference around the waist let me do some interesting pleating at the waist and down the back of the legs.
Let me show you.
This is the back of the skirt, sans train:
This is how it looked on the dummy, just pinned in place – and minus the upper layer of pleats:
After I sewed the lower pleats around the bottom of the skirt, I folded the pleats in on themselves, like so:
And then allowed the folds to travel up the skirt to the waist:
Full view of the finished back (bearing in mind that I can’t properly lace or fit the waist without grommets):
And from the front?
Notice the sleeves have buttons now, and there are more pearl embellishment on the swiss waist.
The train buttons on, just under the upper layer of pleats.
And from the back, you can see just how long that train really is!
Sometime I’m going to have to revisit this skirt “mistake” – I’d like to make a skirt like this in something I would actually wear myself!
Wedding Gown – 6/13/14
This is kind of a fun one for me – I’ve never done a wedding dress before. And this is definitely an over-the-top wedding dress! I purchased 25 yards of ivory faux silk fabric, and except for about 40″ that I’m sending to my co-creator, Tyson Vick, I’m going to be using every bit of that yardage, I think.
I haven’t done more than cut out the fabric for the train, and the skirt is about 1/2 way finished, but the bodice is done except for buttons on the front and sleeves.
Here’s a few pictures.
I really love the collar I designed for it.
The bodice is New Look 6945, but I switched out the sleeves with another of Truly Victorian’s wonderful patterns – the 1980’s Victorian Sleeves Pattern. It was, as always, brilliant to work with…although the sheer volume of fabric required for each sleeve made it quite interesting to make. Since my fabric was on the thin side, I flat-lined it with cotton. Including the lining and a second structural lining of stiff net, that made me use around 8 yards of fabric for each sleeve! Gah! I could have made a ballgown with the yardage I put into these sleeves alone!
I have also completed most of the swiss waist, although it still requires more decoration.
I ruched a panel of fabric, then applied it to the front. It makes a pretty effect, I think.
And here it is, put together. Well, pinned together, since none of the fastening are sew on!
This style of sleeve always looks so wonky without an actual arm inside.
Oh, I forgot to mention: the lace panel on front is a piece of vintage lace I found on ebay. Since the gown is lined in blue silk, this gives the dress “something old”, “something new”, and “something blue”. Philomena just needs to borrow an accessory, and she’s all set for her wedding!
Since I have no reason to keep a wedding dress, this one will be going up for sale after the book’s photoshoot.
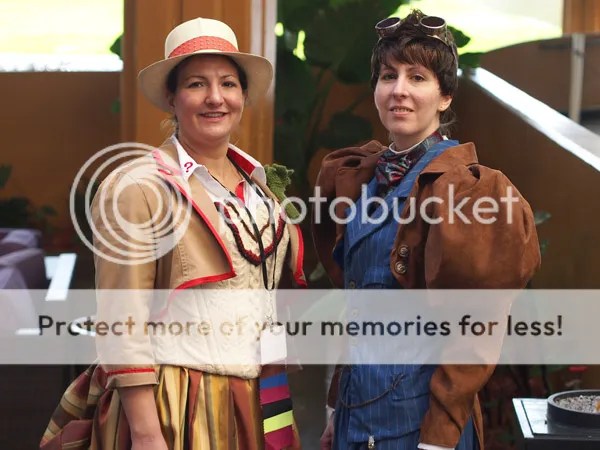
Judges Choice in the Fantasy/Sci Fi Masquerade! “All the Whos in Whoville”. All eleven Doctors plus one extra…. For more info on this, see this blog post.
Oh, look! It’s River!
With Suzette, the First Doctor.
And Arte, the Eleventh.
Gallifrey One 2012
For lots more pictures of me wearing this costume, go to my Random Blog:
And YES. I’m calling this one done – all that’s left is to put the strap on the goggles and add the red/blue lenses. The lenses are being custom made for me by a lovely Etsy seller – and he’s only charging me $4 (including shipping!) If you need anything made, contact him.
So here’s what you’re all waiting for – the pictures!
The blouse has its buttons finally! Read more about the blouse, including pattern info n the post below this one.)
The back of the blouse is gathered.
For the cravat, I took a wide man’s tie, and took it apart and put it back together.
I’m absurdly pleased with it – and it was easy too! Maybe (after Gallifrey One) I’ll do a tutorial for you guys?
It buttons at the side:
The buttonhole is all raggedly – I need to clip the loose threads!
Also, I finished the spats. They are a deeper red than they appear. Stupid camera that won’t capture color right! Like all my spats, they have a hidden zipper under the buttons, and they lace up the back.
Here’s what the suit looks like, minus the coat. The bloomers do not hang quite right on the dummy – since I can’t put them on her (her stand gets in the way of the legs holes.) They are just pinned on in front.
Notice the pocket watch chain across the front?
And instead of doing blue plastic buttons as I did on my previous Tenth Doctor outfit, I decided to go steampunk with metal buttons. Look – they sort of have gears on them! I found them at Walmart, for super cheap, and they are so HEAVY and quality. I’m very happy with them!
So there you are! And I’ll post pictures of me wearing this very soon – this one is going to Gallifrey One with me, in mid-February! If you see me there, come up and say hello!!! I’ll have ribbons!!!!!
Progress! 1/18/12
I was snowed from work today, so I worked on the bloomers. They are done – except for putting in a waist band. Instead of simply gathering the top with elastic (as they did on an extant pair of 1895 bloomers) I’m going to make a fitted waist, then put the gathering on at hip level. There is a LOT of fabric to gather, and I’m afraid it will mess up the fit of the bodice/vest. The bodice/vest is finished except for adding buttons.
Notice all the snow. Gah! I am so not a winter person! But it does make for a difference in the making-of costume pics…and that’s the only reason I didn’t wait to take them until after the snow was gone.
I draped the bodice/vest without using a pattern, and the front of it is pretty much a copy of Tennat’s suit. Only a little more fitted. The blouse still needs buttons as well, and the pattern for that is the Truly Victorian #491. I used the sleeve lining as the actual sleeves, because I didn’t want them to be too bulky under the coat.
I changed the back from Tennant’s suit – I put some gathering in the back, and changed the peplum to more a bustle-look.
And I lined everything in this awesome fabric!
Coat Finished! 1/14/12
Those sleeves were a PAIN. I don’t like setting sleeves, period, and this fabric was thick enough to make gathering and sewing in these sleeves a difficult job. Thank goodness for seam rippers! But here it is, all done:
The upper part of the coat is made using Simplicity pattern #2525, with sleeves from Truly Victorian’s blouse pattern #491. The back with the buttoned flap, I copied from pictures of David Tennant’s coat.
Glad this is done (even though it was largely fun to sew…other than those sleeves!) because I’m on a serious deadline here. And I keep adding more costumes, so it’s totally my own fault. And last night? I was dreaming up a new steampunk costume to wear to the Abney Park concert Jon and I are going to this summer! An early finish to this costume means I might actually get to make it (and heaven forbid!) not have to wear an old outfit! Plus, I’m really excited to get to work on the stuff for Costume Con….this long weekend, I am going to try really hard to finish the bicycling outfit to wear under this Ten coat.
The Coat
First, a few pictures of the original coat:
And because it seems to be impossible for me to find a view of him from the back, here’s one of a replica costume.
I thought of making this outfit Victorian by turning this coat into a 1895 cycling cotume, like this extant example:
After a couple days of work, this is what I have…so far. The sleeve is still only pinned in place, as is the collar.
Because I’d previously made a Tenth Doctor coat (See the page: Femme Ten), I already knew how the back slit works, and it was pretty simple to make another, tailcoat version. The sleeves, however, are being the very devil. I HATE setting sleeves even when they are ordinary sleeves, and these…well, there’s nothing ordinary about those puffy monstrosities! Plus the fabric is quite thick for gathering, so it’s all unyielding and awkward. But I’m soldering through, and the jacket will be done very soon.
I’m going to do an entire blog entry on coming up with this idea, and how to “steampunk” characters that aren’t steampunk, so I’ll just put the finished concept sketch here.
This one will be done by early 2012. I have the fabrics – all I need is time to sew it!
I did not get making-of pics (I was sewing this frantically RIGHT up until I had to leave for Gally!)
It turned okay, although there are a hundred things I will do differently when I make my next cranach. Most notably, I did not have nearly enough fabric to do the rolls on the skirt, so I just had pleats. 😦
But I do like how the painted lettering on the skirt turned out. I made my own stencils, then used fabric paint. The words are repeated three times around the skirt.
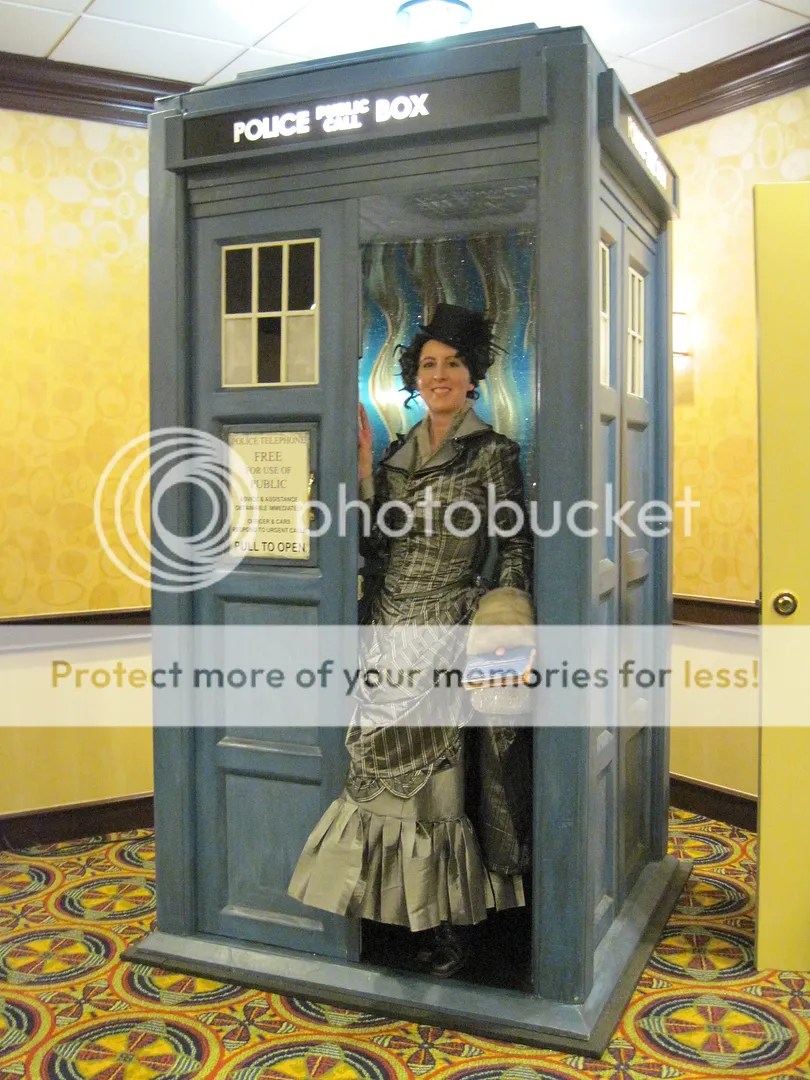
I entered this costume with several friends in the Masquerade: The Doctor Presents His Fall Collection. The idea was that Doctor had created a fashion line that was available ‘anywhere and anytime’. From left to right, we had: Arte as an Elizabethan Dalek, me as the TARDIS, Glynnis as an 18th century Fifth Doctor, Laura as a 1800s River Song, and Grace as a 1920s Weeping Angel.
And we won two Master class awards in the Masquerade! The Project Gallifrey Award for Workmanship, and Best Interpretation.
Necklace
My wonderful and talented friend Laura U. made me the perfect beaded collar to wear with this costume! I’m going to make a small version of the “pull to open” instructions and wear it as a dangle from the collar. Squee!
Concept Sketch 11/2/12
Warning: this sketch is likely to change and evolve, but here’s the idea as it stands.
I was having a terrible time getting the sleeves sketched – I am definitely no artist! The top section is meant to look like the gold bumpy bits on the inside of the TARDIS. The circle design on the lower part of the sleeve will be Gallifreyan writing. The Brustfleck (band across the boobs) has the TARDIS windows on it. I’m still tweaking that. Historically, the brustfleck should be all gold, but I can’t do that if I put the windows on it. I could have something else on it…but what? Oh, and there will be a gold underskirt. And a hat. The hat might well have the TARDIS instructions on it.
All in all, I’m not completely pleased with this design yet, but it’s getting close.
More reference pics 11/2/12
So this picture? I had a comment on facebook that it looked like a Dalek dress. And, you know, it totally does. But it also says TARDIS to me, and until I went back and looked at interior pictures of Tennant’s TARDIS, that I suddenly realized why! Just look!
I’m starting to see my design, here!
Reference Pics 10/31/12
I need to come up with an actual plan of attack for this one…but in the meantime, here’s the idea. This is my TARDIS dress. I’m doing it as a German dress from the Renaissance period; specifically a cranach-style gown. Like these:
PORTRAIT OF A GIRL WITH FORGET-ME-NOTS – Lucas Cranach the Elder
Portrait of a Saxon noblewoman – Lucas Cranach the Elder
This will be for Gallifrey One, in February. I have a ton of blue faux silk. I just need to figure out how to turn this into the TARDIS…..
I was so busy sewing for the Gallifrey One that I didn’t get any in-progress pics like I normally would. So here’s a bunch of me wearing it at Gally. Note: I am not AT ALL happy with the silver underskirt…in fact, I was so displeased, that after I wore it, I gave it away to a friend. It is stretch taffeta, which is the most evil fabric in existence, and it just will not behave like River’s skirt is supposed to behave. I found the perfect non-stretch taffeta in LA, and before I wear this again, I will make a new skirt!
Reference Pics 10/31/12
This is the dress River Song wears during her date with the Doctor. He takes her to the Frost Fair in 1814 for her birthday. Which is kinda weird, because women did not wear this style of dress in 1814, but who cares really? She’s with the Doctor! It’s timey wimey fashion!
My gorgeous fabric fairy Laura U. found me the perfect striped fabric during her visit to New York. All I need is the solid underskirt fabric, and the various trims. This one will be completed by February’s Gallifrey One. So excited! I’ve been wanting to make this one for ages!
I really should explain myself. I was surfing dress diaries, drooling over the Italian Renaissance gowns, especially the courtesan ones, and I thought to myself: I should make one of those. I should create a completely period and authentic courtesan gown.
I didn’t matter that I didn’t own any fabric that was anything like what I needed, or that I already have bins full of fabric for other gowns just begging to be made. The courtesan gown was speaking in a much LOUDER voice, and so I started looking for fabric. And while I was looking, I also made the small error of watching “Dangerous Beauty” for the second time. I know the gowns aren’t correct….but there’s this one scene where Veronica is sword-fighting the rival poet (I forget his name), and she’s wearing this masculine-styled pair of breeches under a skirt. I was doomed. I fell in love with those breeches! The tie-on codpiece! The ribbons around her knees! And oh, suddenly the authentic courtesan idea was buried under the romantic idea of doing a film-inspired one….I could see it all, quite vividly in my head…and even more perfect, I actually had the fabric buried in one of my bins that would be perfect! Add a little burgundy silk dupioni, and while we’re at it, why not a pair of elf ears? Who says there were no elf courtesans in the Renaissance? Because then, see, I can add the headdress I’ve been thinking about all summer and never had the excuse to put together.
Okay, it’s perfect, it’s meant to be.
It’s going to happen.
Begin with the fabric…
Here’s a picture of the fabric….I’m not sure how period it is, but since this the ‘other’ courtesan gown, period doesn’t matter…much. It’s a heavy tapestry, and the pattern will be gorgeous with lots of beadwork sewn over it. That’ll keep me busy this winter!
And moving onto the pattern, I’ve made this extremely rough sketch (I’m no artist!) of my plans.
As you can see, there are the infamous breeches, with an overskirt, a corset, and basically what amounts to a doublet over that. Even the elf ears are there! I do not have a pattern for either the doublet or the breeches, so basically I’ll be attempting to create my own, totally from my own head. Scary.
The Corset
Since I have to begin with the underpinnings, I’m laying the lovely gown fabric aside. Reluctantly. I chose to use the “Mantua Maker” Elizabethan corset pattern, because I like the look of it best. So far, it’s going well. Normally on patterns I am always a size smaller than they say I am – going by their measurements, I have to cut the pattern down a size. This hasn’t been the case with the Mantua pattern….nice. They say I’m a size 4, I AM a size 4, and the cotton mock-up I made seems to fit perfectly. I will be altering it slightly…don’t I always? For one thing, they don’t give an option for a strapless corset, so I’m having to re-work that….
I have 3 yards of gorgeous, hand-woven burgundy silk dupioni on order for both the corset and the breeches. It’s quite thin, which will be fine for the corset, as it’s just the outer fabric, the inner layers will be made of duck. For the breeches, I suspect I’m going to end up adding a cotton lining – just to keep me decent and all!
Woes and whines
The silk dupioni came, and it’s spectacular fabric! Heavier than I expected, and so lovely that now I want to make my future Elizabethan gown out of it…but I can’t even think about that right now.
Sometimes I wonder why I call this fun. I was working on the breeches, now that I have the silk, and they were just not coming together the way I wanted. I thought I had it figured out with the muslin mock-up, so I cut into the fabric itself, and that may have been a mistake….cause now it had to work, or I’ve just wasted 3 yards of silk! I spent a frustrating hour cutting and pinning, and trying on, and then re-pinning, and trying on again…. Finally decided that yes, it does need a lining just to lie right, so I managed to squeak out a lining from the cotton I bought for a corset. Then I proceeded to sew it in wrong twice, necessitating me using my least favorite of all sewing tools: the seam ripper. On the third attempt, I ran out of bobbin thread without me noticing until I was nearly done. Gah. Increasingly frustrated, it was only my extreme stubbornness that kept me going! I can happily report that the fourth attempt was a complete success, and the breeches seem to fit well and look like I was hoping they would. All that’s left is installing the codpiece, sewing on the knee cuffs and ribbons, and doing the finishing – such as hems, and putting grommets in at the lace-up fly.
Now I remember why I like doing this!
The Corset Progress
I’ve been too busy with other things to update lately…but I have progressed beyond the ‘woes & whines’! I’ve got the layers of the corset sewn together and boned, the only thing remaining is to finish the raw edges with silk bias, and insert the grommets in the back. Yes, I know metal grommets aren’t period, but I simply will not take the time to sew them in the ‘proper’ way….and besides, I like the look of the metal better. Anyway, who’s to say that the elves didn’t invent grommet-setters much earlier than we humans did? (That’s my story, and I’m sticking to it!)
So here’s the corset – minus the silk facing, which I added on afterwards, as a separate layer. The rounded thingie sticking out of the middle top is the busk (a removable piece of wood that slips into a pocket running the length of the corset and keeps everything straight and stiff. The reason it’s sticking out, is because I haven’t yet cut it down to the right size.) I ended up choosing spiral steel boning rather than going with imitation whalebone, because reviews made it sound better and easier to deal with. It is! This is the first corset I’ve made that the boning didn’t give me any problems whatsoever…beyond me accidentally sewing a couple of the channels too narrow, and then having to rip them out and redo them when the boning wouldn’t slide into place – and as troubles go, that’s minor!
Yes, this pic is blurry – it’s not your eyes. For some reason, I could not get a pic that was properly in focus. Sigh. Anyway, this is the front. You can see some of the boning channels, as well as the busk still poking out. I didn’t heavily bone this corset. I’m not blessed enough up on top to need all that much support, and after the 1700s corset, I wasn’t in the mood to sew that many channels. It’s made of two layers of black duck sewn together. That makes it fairly stiff even before I put the boning in at all. Incidentally, Elizabethans made two corset lengths in front. You could either have it end ‘to the bellybutton’ or ‘to the Honour’. This one is to the Honour.
And of course this is the back. Again, with the blurry photo! When the grommets are in, and I can actually lace it, rather than just pin it to the dummy, it will look much better. I’ve sewn the silk facing on, but I don’t have a pic of that yet. I’ll try to get a non-blurry one. The grommets I’m waiting to put in until I buy my new setter off ebay….I have my eye on one in particular….
The Doublet
I’ve set the corset aside while I’m waiting for my grommet setter to arrive – meanwhile I’ve gone on to working on the doublet. Since I’ve been lazy updating this site, I’ve got a lot of pictures for you! And I can’t believe how well it’s coming together…no problems AT ALL. This is *so* weirdly unusual that I’m kinda holding my breath, thinking I’m going to discover at any moment that I’ve done some horrible mistake, like make the entire thing a size too small. The seam ripper has not been used, not once. It’s eerie, I tell you, eerie!
So first I made a test muslin directly on the dummy. I was going to use a pattern as a base, but then I thought…I’ve got plenty of .99 a yard fabric, I’ll try to make my own from scratch and see what happens. And here’s where it begins to get weird. It worked! My first try, I only had to scrap one piece. So then, in shock, I dug out some heavier fabric in a pretty tacky color I bought *extremely* cheap for just this sort of occurrence. It’s the same weight and thickness of my real fabric. I cut it out and sew it together sans sleeves. Weirdness again. I like it. It’s working. I do get one picture:
Notice the collar is only half there, and only pinned. The one sleeve is the actually trim I’m using, but only *part* of what will be there, eventually. Underneath it, you can see my corset, nicely faced in the silk dupioni, but still with rough edges. I *say* I’m waiting for the grommet setter, but I’m actually procrastinating. I hate finishing edges, and I know I’m going to hate working with the dupioni. Be aware that the silk dupioni looks a completely different color in this pic than it actually is. It’s much more a burgundy, not that *bright* red!
So after the successful test, I bravely went on the actual fabric. It’s so gorgeous. Here’s some pics, with most of the major seams sewn together, and everything else pinned in. The sleeves are still not remotely what they’re going to be!
Front view. Can I say that I love the ribbon trim? I wish I’d bought several more yards at the time, but now I can’t find it anywhere to buy more. I’m trying to scrimp so I have enough for an Elizabethan Faerie Queen dress I’m planning.
Side view. Imagine it sewn with pearls and beadwork.
And the back.
The Joy of Grommets
Who knew I’d ever title a section of this diary that? Grommets have never, ever, been a joyful matter. For years I’ve used one of those hand-held ‘pliers’ type of setter, and let me tell you, it has not been fun. I *dread* setting grommets, and yet…I seem always to make costumes that require lots and lots of them!
So finally (at last!) I ponied up for a $50 new grommet setter called the “Home Pro LR”. It’s HEAVY (no wonder it cost $15 shipping), it’s purple, and it’s fantastic. I cannot believe how much I enjoyed setting the grommets in this latest corset!
For anyone who’s interested, I bought it off ebay from this seller: http://myworld.ebay.com/faireladycom She was very professional and nice to deal with.
Progress…
With our wonderful so-called ‘global warming’, we’re having the coldest June since the 1800’s…and this is making me think…perhaps I *do* need to finish this outfit for my August faire. Heaven only knows what the weather will be like. I’ll take one warm set of garb and one cool. Plus, I’ve missed working on this!
I may not have time to finish the breeches, but I have 3 more yards of the wine silk dupioni on order, so I’ll make an underskirt. In the above photo, the skirt is still just pinned together, but the doublet itself is so close to being done! I need to add a few more pearls to the collar, sew on the trim along the front edge, and hem it.
Here is a close up on the shoulder, showing the pearls and gemstones I sewed on. I still need to add poufs of gold silk in between each jeweled section.
Here’s the side view. There is a ‘bum roll’ underneath the skirt to give it a full appearance, and make my waist look small!
Yesterday I went to the fabric store and scored 2 yards of the most beautiful thin cotton for the chemise/partlet. Since I also plan to wear this with breeches, I’m not making a full chemise; it’ll be short, like a blouse. The cotton I bought is stark white, but the lace I found is cream…so I soaked the cotton in a tea/coffee mixture to darken it.
Foot Fetish
Nope, it’s not ME has the foot fetish, it’s this gal.
Meet Panda, my ferret. What has a ferret to do with a costuming diary? So glad you asked. Panda lives in my crafting studio, and enjoys herself immensely helping me re-organize my patterns and my fabric, and running away with my ribbon spools and my seam rippers. I can live with that; I know where her secret hiding places are.
What I have difficulty living with is setting in shoulder puffs and sewing on pearls while she’s chewing on my feet. I don’t know what it is, but she cannot resist feet – anyone’s feet, not just mine. Bare feet, shoes, socks, slippers…it’s all the same to her. She doesn’t bite hard enough to hurt, but even so, it’s distracting. She was especially fond of the socks I wore today, and the only way I could get her to leave me alone was spray sour apple stuff on my feet.
I now have damp socks, just so you know. These are the trials of a costumer no one talks about!
But despite Panda’s efforts, I do have progress to report. The shoulder poufs on the doublet are finally done.
Inside the puffs of gold silk are pearls, but in this pic you can only see one. I put in grommets underneath the ribbon layer, so if I have time, I can make a set of long lace-in sleeves. I’m still thinking about the design for those. I’m declaring the doublet officially done, except for the hem – which has to wait until I can try it on with the skirts, the bumroll, and the chemise.
And here’s the shirt/chemise, nearly done. This was an interesting project. I wanted the collar to stand up, so I sewed in covered florist’s wire around the edge and periodically down the back of the collar. I still need to starch the lace, but it stays well, even as-is. The only part left to finish is the sleeves. I’m delaying those because I want to embroider down the length of them with a tiny leaf and flower pattern, using cream thread.
Also in this photo is a peek of the new dupioni underskirt. That’s done except for the hem as well.
Zibellini
Or it’s sometimes known as a flea fur, because it’s thought that ladies carried decorated pelts of minks or martins with them in an effort to make any fleas jump to it, rather than their own skin. (Gives one a whole different picture of Queen Elizabeth I, doesn’t it? Did she really have fleas???) In the portrait below of Queen Elizabeth I, you can see her zibellini.
The mink’s eyes were often inset with jewels, and their heads and feet adorned with gold and more jewels. I decided I needed one of these. I purchased a vintage mink pelt from one of my fellow wenches, and after literally hours of ebay searching, found a brooch and earring set that works just perfectly! Here’s a picture of the finished result:
For some reason in this picture, the eyes don’t look like the lovely ruby gems that they are, and the color of the brooch and earrings looks more green than black – and I may change the ribbon tied around the tail to a black velvet one to match the jewels. I think it turned out quite well, otherwise – I love the rich red of the mink!
Bad news and the Silver Lining…
Well, as some of you know, my renaissance faire, the one I was planning to wear this to, was canceled for 2008. http://www.washingtonrenfaire.com Fingers crossed that it’ll be back for 2009.
The only good news about that is, I don’t have to work my fingers to the bone to finish it anymore – I now have an entire year. So I ripped apart the silk dupioni underskirt to use as fabric and went back to my original plan of breeches underneath the overskirt. I finally got the pattern worked out, so I’m pleased. It fits! And more importantly, there’s lots of room in the bum so I can sit comfortably on hay bales and the ground. (I was a bit worried about that in my first attempt!)
Also, I want to do a faerie pirate costume soon, and I think I can use these breeches with that. It all depends on whether I can find the fabric I want for the combo corset/jacket in a matching color….
Doublet Re-done
I decided to rip apart the front of the doublet and re-design it…what can I say? I’m giddy with all this extra time! So here’s what it looks like now:
The front needs some decoration, I think, so I’ll sew on a bunch of peals when I get the time. The collar is so washed out in this photo that I doubt if you can tell, but I’ve decided to raise it quite a bit taller. It will be a removable piece that tucks down into the shoulders…the mechanics of that is still to be worked out, though I have a few ideas. I also ripped the lace off the shirt and will remove all the wiring I was *so* proud of (and that also took me a really long time to sew in). With my new removable collar design, I no longer need it. I’ll re-cut the neckline of the shirt into a new, simpler outline – more like a partlet. The sleeves are sewn in and hemmed, so I just need to gather the cuffs at the wrists and attach the lace.
Here is a progress shot of the breeches. Notice the lace-up fly – which will eventually be covered by what I’m calling the ‘codpiece’ for lack of a better term. The breeches will be gathered and tied just under my knees. I need to watch “Dangerous Beauty” again to see exactly how the ties look.
It’s looking good. I’m starting to think about lace-in sleeves for the doublet…I just can’t decide what style I want. At least I have quite a bit of the brocade left, enough for whatever I decide. Possibly something similar to the photo below.
Or possibly, like these:
Collar
So after a whirlwind trip to Jo-Ann Fabrics, I’ve been sewing the new collar. It’s been an experience, because I have zero idea of what I’m doing, and I haven’t researched out how it *would* have been done, historically – I’ve just been winging it, based on how I know it’s supposed to look. This could have been a bad, bad mistake, but as it happens, it’s been working out. Good thing, because I’ve already put considerable work into it, and I’m still not done.
What I decided to do is: I cut out two of the shapes I wanted in the stiffest interfacing I could find (the kind that’s commonly used for belts). One of the shapes, I boned exactly the way I would bone a corset – by sewing in fabric channels, and cutting lengths of wire coat-hanger to slide up into them. Then I covered this shape in the same gold fabric as I used on the sleeve puffs. The second shape, I covered in pleated cream lace. Below is the lace shape:
Here’s a close up of the pleated lace.
I then sewed both shapes together, so that I have the stiffened, decorated base.
And here’s how it looks, pinned in place. Now I need to figure out how to attach it securely, and sew on the lace trim. I’m using the same ‘pointed’ lace as I used on the original collar. It’s a funny thing…that lace was not what I really wanted, but it was the best I could locate. Well, when I was skimming through my Elizabethan costuming book, I found 3 portraits that used almost *identical* lace! I’m now much more pleased with it, since it’s obviously correct for the period.
Notice the new pattern of lacing on the doublet; it’s called “ladder lacing” and this likely what I will use when I lace it up with me inside. I’m still deciding on the color of lace: I think either burgundy (as shown) or gold.
And lastly, just a visual aid to how hard I’ve been working, here’s a current shot of my studio:
Fabric scraps, bins full of lace, trim, and ribbons, and in the center bottom, there’s a bag of polyester stuffing. That is where Panda the ferret has been sleeping!
Collar re-vamped yet again…
I’m just really indecisive on this whole collar thing!
So, I finished the blouse, and it looks wonderful!
Lace cuffs….and that’s *two* layers of lace, that is!
Full view….though this one was taken with the flash, and is so washed out that most of the detail and lace has disappeared.
A close up of the sleeves, showing the natural woven pattern, plus the cotton braid I’ve sewn on for even more texture.
And here’s the shirt in place under the doublet where it belongs. There is two layers of lace here, too, and it’s so dramatic, that I’ve changed my mind (again!) about a separate stand-up collar. The stand-up collar looks great, but I think it looks too royal. This shirt has enough lace for a courtesan all on its own! I’ll save the collar though, and can always attach it at any time if I decide to play a queen at faire. Or, I can always sew an entirely *new* dress just for the collar! I’ll get a good close-up of the lace later, without the camera flash. It’s gorgeous stuff.
So…what have I got left to do?
1) Hem the skirt…but I have to choose shoes first.
2) Sew the detachable sleeves for the doublet.
3) Bead the front of the doublet with pearls. I’ve started that already, but no pics yet.
4) Finish the knee cuffs on the breeches.
5) Make/buy a hat. Or possibly a snood?
6) Make the feathered fan. I think I need to buy more feathers….
7) Make the jewelry. Belt, earrings, and necklace.
And…I *think* that’s it. Oh, wait…
8) Buy these fantastic ears I saw on ebay – when I have a spare $30 laying around. I’m dead set on these, as they are about 6″ long and – oh here. I’ll show you a picture; there’s no way to describe such splendid ears!
It’s a well known fact that courtesan elves have large…ears…
Boring title here (thanks to B. .)
So here’s the progress after a week of fairly steady beading:
The above photo is of the very beginning, when I was just getting started. There are two stripes of ribbon sewn on, one stripe sewn flat just left of the grommets, and the other gathered onto the right side. I went back and forth on the ribbon, deciding whether it was too much. Then I thought…heck, during this era, there’s no such *thing* as too much. It’s pretty amazing; I had *exactly* enough ribbon to do what I wanted – and I had *only* that much. I’d bought a spool a couple years ago because it was pretty, even though I had no idea what to use it for, so once the spool was used up, there was no way of finding any more. I think this dress is lucky…we’ll see what happens when I get to actually wear it!
And here the front is, finished. The two loops of pearls across the front and the necklace are temporary place holders, for whenever I get my jewelry made. Plus, the doublet is only half-laced, because I was too lazy to lace it all the way just for a photo! There’s only one more short bit of pearl beading left to sew on. You can’t see it in this picture, but along the collar of the doublet, just under the points of lace, I need to add a line of pearls. I can’t do it yet, because I used all my pearls up and have an order in for more.
All-Staff Work Training Day.
I work at a library, and the Powers That Be recently decided to close up for a day to the public and have a “staff training day”. They told us to wear an “article of clothing that has special meaning to you”. Okay, I was stumped. I just don’t get that emotionally attached to my clothes. But then I realized….hey, I’ll wear my new Elizabethan corset! If anything has “special meaning” to me, it’s my costumes! So I wore a black tshirt with my corset laced over it, and thereby had the opportunity to give it a test-wear, and see if I found any problems with fit or comfort before I wear it with several pounds of doublets and skirts over it.
The good news is, it gave me no problems at all. The fit was perfect, and it was so comfy that I kept forgetting I even had it on.
The bad news is, the training day itself was just about as interesting and helpful as I feared it was going to be.
Breeches are finished!
This means that ALL of the parts of the gown are officially done now. Though I have yet to make most of the accessories, I have been talked into wearing it for Halloween to work. That’ll give the comfort/stability of the costume a good try-out before I actually wear it to my renfaire. I wish I had the fan completed, though… Pictures to follow, after I get some taken!
Forgot to take pics of the breeches.
But here’s a few others:
This is the girdle and a matching choker. I was lucky enough to find this bracelet at Target two years ago that had these chunky ruby gems – they look *so* well as Renaissance jewelry.
Here’s a close up. I must have restrung these 5 times – I kept getting the length wrong….
And here’s my hat. You can’t see all the feathers in this shot; it has turkey wing feathers, ostrich feathers, and peacock feathers, so it’s pretty feather-y. The red band is a strip of my burgundy silk dupioni.
I’ll be dressing up in it for Halloween – minus the fan, purse, and elf ears, which I didn’t have time to make or buy – so come back for pictures after the 31st!
Halloween pictures
This is me at work, on Halloween.
Quick snap-shots, but you get the idea. When I actually wear it to the renfaire, I’ll try to get some properly posed ones, in a more period setting! Unfortunately, I sort of blend into the shelves here, and you can’t really see the great effect my bumroll is giving to the back of my skirt!
Good news, though, I wore it all day while working, and nothing slipped, slid, poked, or dug into me anywhere!
Photos taken by Bonnie H. Thank you!!!
Purse Frame
I had stopped thinking about this costume for awhile, as the next time I’ll wear it will be at renfaire in August. Plenty of time to worry about the accessories! But I just saw this purse frame for sale, and couldn’t resist it.
I ordered the one in ‘antique gold’. If you look closely, you’ll see there are two peacocks hissing at each other!
Finished
I’m calling this the “Dangerous Beauty” inspired courtesan outfit now, because I’ve moved on from the idea of it ever being an elf. (I think…who really knows what I’ll do?) I finally finished the breeches and sleeves, and wore it to a Masquerade Ball, so here are a few final pictures.
The new front of the breeches.
The tie-on codpiece was a hit at the ball. Silly me, I thought no one would notice!
I also made long lace-one sleeves with beading along the bottom edge. They have beaded ties at the elbow to hold them in place.
Notice the Wig of Glory….I made courtesan horns on it!
I made the mask as well. I started with a paper mache mask base, then sculpted flowers and leaved over it with Paperclay, then painted it and glued on jewels.
The sculpting done, but unpainted:
And painted:
For more pictures from the event, and pictures of my friend’s costume (she used an awesome 18th century youtube tutorial for her hair!) visit my other blog:
Elizabeth Bennet, Zombie Slayer (maybe Vampires, too)
Pride & Prejudice & Zombies. I don’t think the book is meant as costume inspiration, but what other excuse do I have to combine my desire for a Regency dress with my desire to carry a Katana sword?
Taking a break from Steampunking, I decided to clear my mind with something white, simple, and decidedly non buckle-y.
I started with this pattern, which I’ve been wanting to try for at least five years.
Yesterday and today I’ve made most of the half-corset and shift. Pictures will be posted later. I was really impressed with how easy this pattern was, and highly recommend it. It even fit me on the first try without the tinkering Simplicity patterns usually require (especially for corsets). The only thing that went wrong was that I sewed one of the underarm gussets in the wrong way around; but that’s normal when it comes to me and gussets! I just don’t do them enough, and they always seem so simple (and they are, really) that I get overconfident and stop paying attention to what I’m doing. I’m making my shift longer than the one pictured; the dress fabric is so thin that I want a bit more coverage – it would look weird to have half my legs semi-visible.
For the dress itself, I’m thinking very simple and white, something like the pictures I have posted on the page for the “1800s White Dress”. I want a Spencer jacket, but I’m still figuring out the design. I like these:
The back of this is just too cute!
I like how this one unbuttons to show off the front of the dress.
This one is probably my favorite so far. Love the buttons down the side and the military look. Maybe I’ll do something like this, only with the back of the first jacket?
I know I want a dark color for the fabric. Maybe this green, or a dark red? If I can, without ruining the line of the jacket, I’ll slip in a few pockets for a zombie slayer’s tools of trade.
I found really great shoes on ebay. $7. I like the bit of a heel, and some extant shoes I’ve seen have had little heels, so I think it’s okay that they aren’t perfectly flat.
And bonnets. Oh joy! I have always wanted to wear a pretty poke bonnet, but none of my previous costumes have allowed me to possess one. This is a sad lack, which I intend to make up for right away.
I found this fabulous site that shows how to create an authentic-looking bonnet for cheap. Cheap is good. I already have a straw hat of the sort you begin with, so it will be just the cost of ribbons and flowers…most of which, I probably already have squirreled away, depending upon what colors I choose. Link to bonnet site
This site even has a video tutorial for bonnets. I love this person, whoever she is!
Pretty Pictures
While trying to figure out what I want my dress to look like, I found these pictures:
Since most of the gowns I like best are from around 1810, that’s the period I’m aiming for. Now, on to the pattern. If you do a search for “regency pattern” you’ll get linked to the “Sense and Sensibility” patterns most often. I considered buying that pattern, but whenever I look at the gowns that are actually sewn from those patterns, they don’t look quite right. I suspect it’s because few of those women are wearing the correct period undergarments, but it’s still making me wary of the patterns – even on the pattern-maker’s website, she has models in modern variations of the Regency era. I don’t want to pay $16 for a modern look, so I decided to pass.
Instead, I’m going with Folkwear’s #215 Empire Dress pattern. I’ve seen a number of costumers use this pattern for Regency wear with excellent results. And I’ll be only using it as a general starting point, anyway. I have a couple of Simplicity not-so-historically-accurate Regency gown patterns as well, so I’ll probably sort them out together and do a bit of mixing and matching.
For the Spencer Jacket, I’ve selected the Rocking Horse Farm Pattern:
Shift and Corset
All corset should be this easy to sew!!! Since I’m not particularly “fluffy” on top, and I used a really stiff duck canvas as the lining, I didn’t even bother putting in boning. From what I’ve read, many period women didn’t either. It’s basically a sport bra with the lift-up of an underwire…without the discomfort of an underwire! Very seriously cool.
The new shift is underneath, the sleeves still need to be hemmed (right now they’re just folded in and pinned).
The shift is still not hemmed, as well.
And the back view….
And the side.
And hey, I just realized…since it’s most handy to my studio (that’s my studio window in the photo) I’ve been taking these costume pics in the exact same place. You can literally watch my garden grow. 🙂 Maybe by the time I finish the gown, the peonies and roses will be blooming!
Peonies Blooming…
And the bodice of the gown is just about done. I just have one more sleeve to finish!
It’s the sleeve on the right that’s finished, by the way. The skirt is not at all done; it’s not even started. I just pinned some fabric very roughly in place and wrapped a ribbon under the bust to hold the bodice gathers in place temporarily.
Side view:
It’s hard to tell in the picture, but there are three wooden buttons on each sleeve, with a loop of white ribbon looping over them to “puff” the sleeve. It was…interesting…figuring that design out. The pattern suggested it as a “period alternative”, but I’m still not sure I got it quite right. Oh well, it looks really good, and since most women made their own clothes during this time, I imagine there was a lot of figuring things out on the fly.
Back view:
And please do admire those buttons! 🙂 More wooden ones, to match the ones on the sleeves. I’m getting pretty good at buttonholes. They almost don’t freak me out anymore.
In this picture, you can just barely make out the white-on-white embroidery on the fabric.
I can’t wait to start work on the bonnet – all this white sewing is getting old fast – but I’m going to force myself to finish the other sleeve and finish the skirt, first.
Here’s an unofficial poll: Do you think the ribbon at the waist should be white (as shown) or another color? I can’t decide.
Success!
I finished the other sleeve, and sewed on the skirt today (it still needs to be hemmed, once I decide upon the length). And then, I had the first try-on!
Here’s a video:
I still have to decide what ribbon color…so far I’m getting no votes that agree! I think it definitely does need a ribbon though, to help define the empire waist.
Also, I’ve been thinking about the whole “battle rips and blood-splatters” on this dress, and I’m highly reluctant to permanently deface this gown. If I don’t, it’ll be available to wear for an Austen tea or somesuch elegant event. So here’s the plan: I’m going to sew a false front panel and attach it to the ribbon waist. I can splatter and rip that, but then, when Halloween is over, I can pull out the stitches and re-use the dress. I’ve done a rough mock-up of the panel, and it looks good – like it’s really part of the dress.
Now I need to research what to use for blood. Good thing I ended up with some extra of the white fabric. I’ll be able to run some tests of color, texture, and splattering technique!
5 second search on google…
Did you know there’s a band called “Fake Blood”? Two bands, actually.
First on my list, try this blood:
Soy Sauce Blood to Splatter
Get the small plastic tubing and force it onto the end of the syringe. Use tape or glue to make this an airtight seal.
Pour some soy sauce into a cup or bowl and add the red food dye. Add enough so the blood is dark red.
Put the end of the tubing in the cup or bowl and pull back the plunge to suck up the blood.
Use BLU Tack to clog the end of the tube. Make sure this is well clogged.
Push on the plunger to release a spray of blood.
The Katana
Since the “buff n rub” stuff worked so well on plastic water guns for steampunking, I decided to give it a try for the sword.
I started with this, a cheap (very cheap) plastic Ninja sword. You actually can’t tell in this photo how truly cheap it is. Grey plastic for the blade, icky shiny metallic for the hilt, wrapped around with fraying black twine.
I tore all the twine off, and gave it a base coat of black Krylon paint. Then I went to work with the Rub n Buff.
Much better! I re-wrapped the hilt with black leather strips, and attached a tassel.
And then I added some blood. I may add more later.
Now I need to fix the scabbard. I’ll have to do some research first…I’m not sure what sort of scabbard a Katana is supposed to have.
The Bonnet
I had a chunk of black and white stripe fabric left over from the pirate coat’s underskirt, so I decided to use that. I also had lots of black grosgrain ribbon in various widths in my ribbon box, so a few of those, a few black buttons glued on for decoration, and huzzah! One Regency bonnet. It was so easy and fun that I may make up a couple others and list them on my etsy store!
I will also make a white lace mobcap for underneath, so that a bit of lace shows around my face. I think that would be pretty.
The Mob Cap
Looks good under the bonnet, doesn’t it?
Finished!
And with time to spare, too. How unusual for me.
White on white, in the photograph you can’t really see the rips. But there are several. The smaller spots of “blood” don’t show up well either. I decided to do a more ‘ladylike’ blood splatter – I did a test run of more comprehensive splatter and decided I didn’t like it as well. I used a mixture of soy sauce and red paint, and it worked well. Since the paint was a bit thick and I didn’t mix it entirely into the soy sauce, I ended up with a cool “clotted” look. Little bits of brain, don’t you know! I also didn’t have a syringe, so I mixed the blood in a small bowl, then dipped a small amount up with a spoon and sort of snapped the spoon at the dress. Good thing I was wearing old clothes, because I got a bit of backwards spray as well! You know, if I were the neighbors, I’d be worried about me. There’s always strange goings-on in my backyard!
Close up, showing the katana.
The back, with Katana. Most of my Katana scabbard research showed very plain scabbards. So I left it black, but fancied it up a little with criss-crosses of white ribbon. This is my “dress” Katana, after all!
For jewelry, I’ll wear my little cross (period accurate), but I need to get a shorter chain.
Monday, August 3rd, I’ll be wearing this to work for “Dress Like Your Favorite Character Day”. I’ve heard some library patrons discussing “Pride and Prejudice and Zombies” just this week, so maybe a few people will actually know who I’m supposed to be.
Pictures of me in costume will be posted shortly afterward.
Finished & Modeled
So I wore this as planned to my workplace (a library) for “Dress as your Favorite Character Day”. It was a big hit with the patrons – a couple even guessed who I was supposed to be! 🙂 One senior gentleman happened to have his camera and asked if he could take a picture. Fun.
I promised pictures and here they are. Bear in mind that we had to very little time after work to take them (and the person is charge of the camera is not very tech-savvy. At all.) 🙂
Yes, I have that expression on my face because I’m having to explain to press that little button on the top! I’m wearing my katana, but only belatedly (as in just now) realized it doesn’t show up against the lush garden background.
Ah, there’s the katana!
And here’s a video of me. Again, crappy camcorder and inept (but love-able) operator!


 Plus, I’m really excited to get to work on the stuff for Costume Con….this long weekend, I am going to try really hard to finish the bicycling outfit to wear under this Ten coat.


 .)
.)
 It’s pretty amazing; I had *exactly* enough ribbon to do what I wanted – and I had *only* that much. I’d bought a spool a couple years ago because it was pretty, even though I had no idea what to use it for, so once the spool was used up, there was no way of finding any more. I think this dress is lucky…we’ll see what happens when I get to actually wear it!


 I think it definitely does need a ribbon though, to help define the empire waist.


